DIY decorative boxes for props transform ordinary party spaces and photo shoots into memorable experiences without the designer price tag.
Look, I get it. You’re staring at your living room wondering how to turn it into a pirate ship deck for your kid’s birthday party, or you need theatrical props for the community theater production but the budget is tighter than skinny jeans after Thanksgiving dinner.
I’ve been there—standing in my garage surrounded by cardboard boxes, hot glue burns on my fingers, wondering if I’d bitten off more than I could chew.
Here’s what nobody tells you: making professional-looking prop boxes isn’t about artistic talent. It’s about knowing which shortcuts work and which ones leave you with a wonky mess that looks like a kindergarten art project gone wrong.

Why Your Props Look Homemade (And How to Fix That)
Contents
The difference between “cute DIY attempt” and “wait, you made that?” comes down to three things:
Structure matters more than decoration
A beautifully painted box that wobbles isn’t fooling anyone.
Layering creates depth
Flat paint screams amateur hour.
Finishing touches sell the illusion
That final clear coat or metallic highlight makes people stop scrolling.
What You Actually Need (Skip the Craft Store Rabbit Hole)
The Non-Negotiables
For Lightweight Display Props:
- Foam board sheets (the 20×30 inch size works for most projects)
- Sturdy cardboard boxes (raid your recycling bin first)
- Construction adhesive (hot glue won’t cut it for anything structural)
For Heavy-Duty Theater Props:
- 1×2 inch wood strips for framing
- Plywood sheets (1/4 inch thickness keeps weight manageable)
- Wood screws and cordless drill
For Every Project:
- Gray primer spray paint (this is your secret weapon)
- Acrylic paint in your theme colors
- Cheap foam brushes (toss them when done, life’s too short for brush cleaning)
The Game-Changers
These aren’t required, but they’ll bump your project from “nice try” to “seriously impressive”:
- Metallic spray paint (gold transforms everything)
- Modeling paste (creates those raised details that catch light)
- Chipboard or mat board (perfect for book spine ridges or architectural details)
- Clear acrylic sealer (makes props touchable without destroying them)

The Pirate Crate That Started My Prop Obsession
Three years ago, my nephew wanted a pirate party. Not just pirate-themed plates—full commitment, treasure maps on the walls, the works.
I found myself building fake wooden crates from foam board at 11 PM the night before. Here’s what worked (and what definitely didn’t):
Building the Structure
Start with measurements that make sense
I made mine 18x12x10 inches—big enough to look substantial, small enough to move easily.
Cut your foam board:
- Two 18×12 inch pieces (top and bottom)
- Two 18×10 inch pieces (long sides)
- Two 12×10 inch pieces (short sides)
The assembly trick nobody mentions
Don’t try to glue all sides at once. You’ll end up with wonky corners and paint-stained curse words.
Connect two adjacent sides first. Let them dry completely (I know, I know, patience isn’t fun). Add the third side. Wait again. Finish with the remaining sides.
My first crate looked drunk because I rushed this step. Learn from my impatience.
Making It Look Real
Here’s where the magic happens:
Create wood plank illusion
Cut thin foam board strips (about 1 inch wide). Space them evenly across each side. Glue them down to mimic wooden slats.
The texture makes all the difference—seriously, this single step transformed my sad foam box into something people asked where I bought it.
Paint with purpose
- Prime everything with gray spray primer (yes, even if you’re painting it brown eventually)
- Base coat in medium brown acrylic
- Dry brush darker brown in the “grooves” between slats
- Lightly dry brush lighter tan on the “raised” edges
That three-tone approach creates depth that flat paint never will.
Weather it properly
Real wooden crates aren’t pristine. Lightly sand edges where natural wear would occur. Add black paint in crevices. Splatter watered-down dark brown randomly (put newspaper down first, trust me on this).

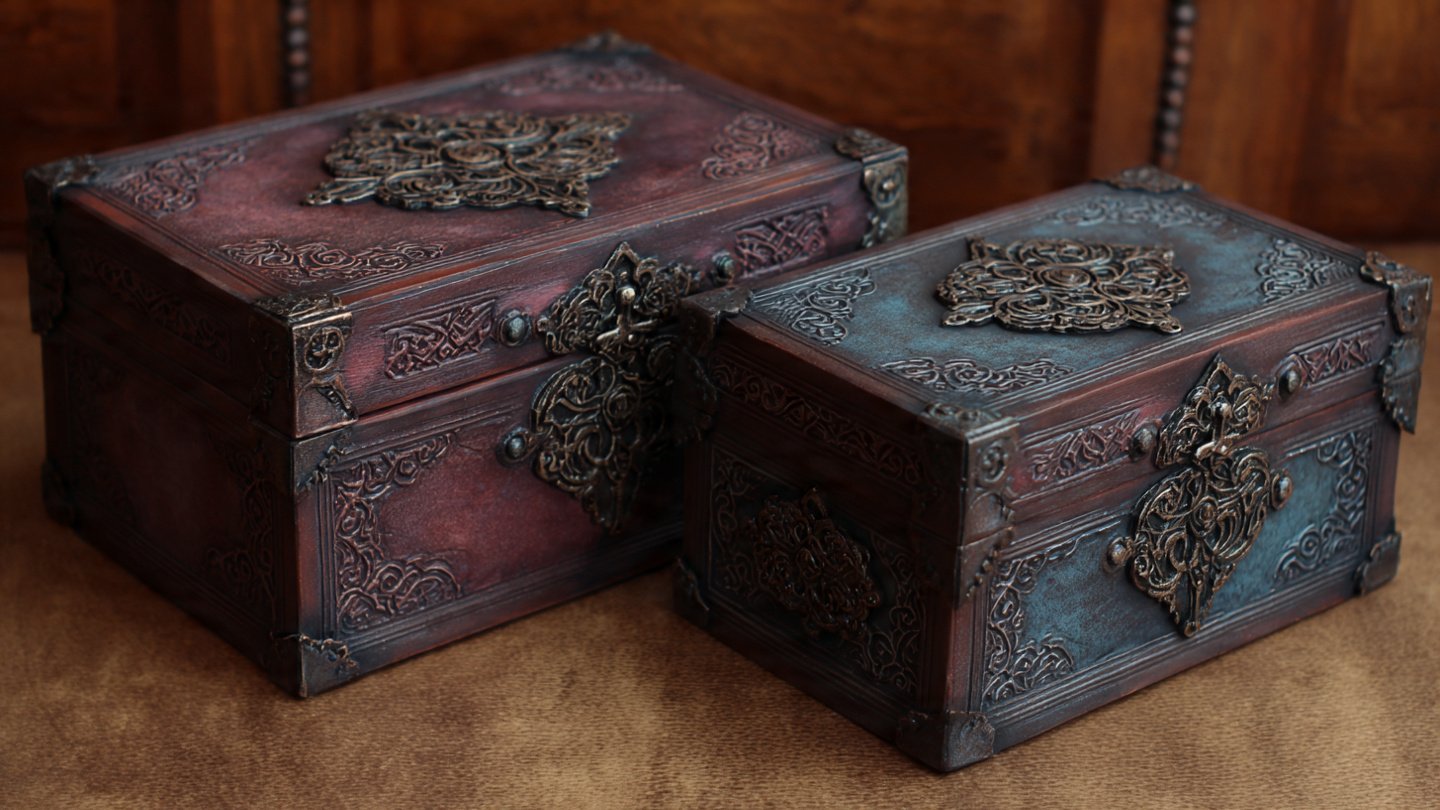
The Vintage Book Box That Fooled Everyone
After the pirate crate success, I got ambitious. A photographer friend needed vintage-looking boxes for a styled shoot.
This project taught me that fancy doesn’t mean difficult—it means strategic decoration.
The Foundation
Started with plain cardboard boxes (the kind Amazon ships in work perfectly).
Instead of fighting the cardboard texture, I embraced it:
- Cover the entire box with kraft paper or cut-up paper bags.
- Use fabric tape or regular masking tape over seams.
This creates the old book binding look without buying actual bookbinding materials.
Adding Book-Like Details
Create spine ridges
Cut chipboard into thin strips. Glue them horizontally across one side to mimic book binding. Space them irregularly—real old books aren’t uniform.
Model the raised details
Apply modeling paste with a palette knife to create decorative corner pieces. I made simple Fleur-de-Lis shapes using a butter knife (because I’m fancy like that).
Let it dry completely—rushing this creates cracks that look intentional only if you’re making ancient artifacts.
Paint like you mean it
- Base coat in deep burgundy or forest green