How to Create the Perfect Alice Madness Returns Cosplay from Scratch
Contents
I’ve spent way too many hours researching Alice Madness Returns cosplay, and honestly? It’s one of those projects that looks way harder than it actually is once you break it down. The twisted, dark version of Alice Liddell from American McGee’s game has this incredible visual appeal that makes the effort totally worth it. And I’m gonna walk you through exactly how to pull it off, even if you’re not some expert seamstress.

Why Alice Madness Returns Cosplay Is So Popular Right Now
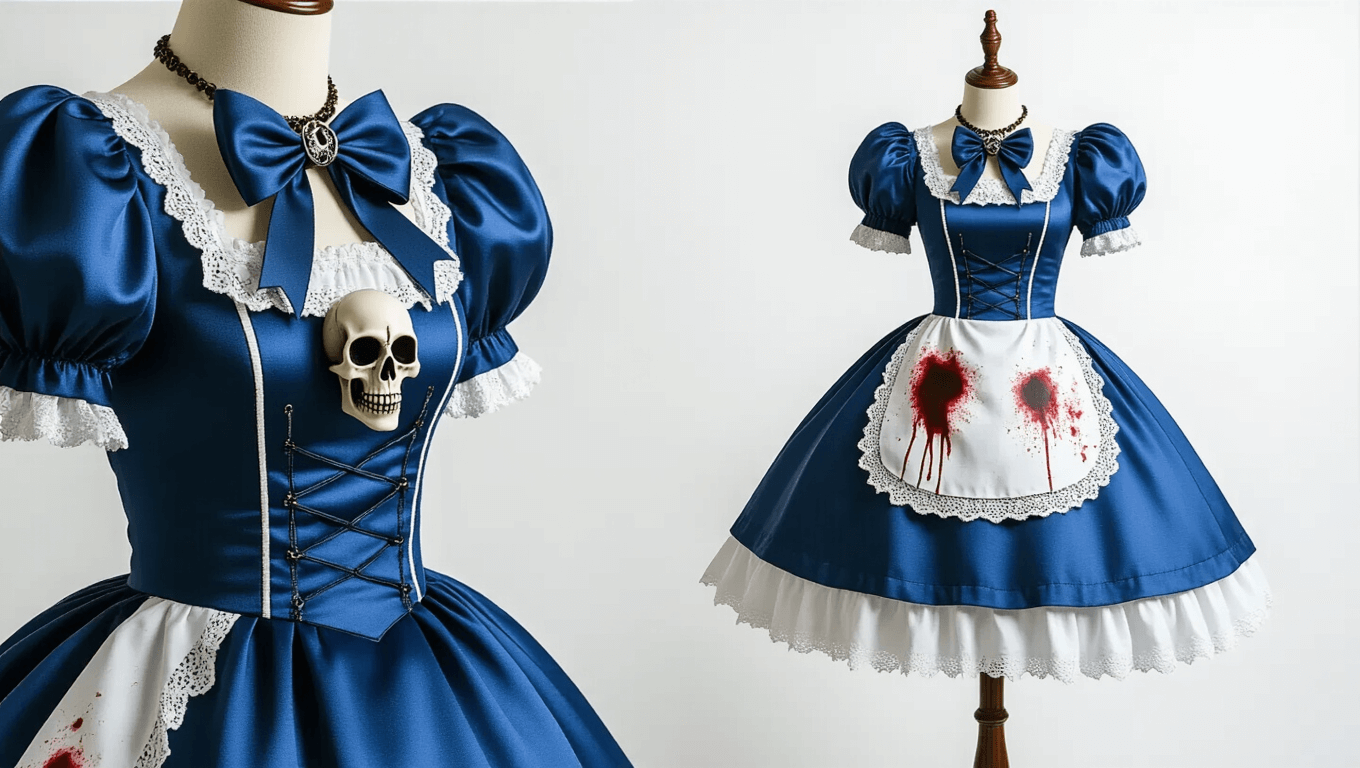
Let me be real with you for a second. This isn’t your grandma’s Alice in Wonderland. The game’s aesthetic hits that perfect sweet spot between gothic, creepy, and somehow still adorable. Alice’s signature blue dress has this weathered, battle-worn look that tells a story before you even open your mouth. Plus the character designs in this game are just chef’s kiss level good. When I first saw someone rock this cosplay at a convention, I literally stopped mid-walk to stare. The way the petticoat creates that perfect silhouette, the blood splatters on the apron, that creepy skull bow—it all comes together in this hauntingly beautiful way. And here’s the thing that surprised me most: it’s actually doable for intermediate sewers. You don’t need to be a costume design major to make this happen.

Breaking Down the Alice Madness Returns Costume Pieces
Alright so let’s talk about what you’re actually making here. The complete outfit has five main parts that all work together.
The White Petticoat
This is your foundation layer and honestly the most important piece for getting that iconic silhouette right. It needs to be puffy enough to give the dress volume but not so crazy that you can’t fit through doorways.
The Blue Dress
This is the star of the show—that gorgeous fitted bodice with puffed sleeves and gathered skirt. The blue needs to be rich and saturated, not some washed-out baby blue.
The White Apron
It sits over the dress and has that fitted bodice style with pockets. This is where you get to add all the cool weathering effects and paint splatters.
The Skull Bow
That creepy-cute bow that sits in her hair with the skull decoration. It’s smaller than you think but makes a huge visual impact.
The Omega Necklace
Alice’s signature necklace is the finishing touch that true fans will notice immediately.

What You’ll Actually Need to Buy
Okay so shopping list time. And no I’m not gonna make you hunt down some obscure fabric from a specialty store in another country.
For the Dress:
You’ll want Casa satin or similar blue fabric—get more than you think you need because running out halfway through sucks. Blue satin fabric works perfectly for this project. Interfacing for structure, one zipper for the back, and thread in matching blue. If you’re using a pattern like Simplicity 1093 for those puffed sleeves, grab that too.
For the Petticoat:
White cotton is your friend here—Kona cotton gets recommended a lot and for good reason. You’ll need elastic for the waistband, lace trim for the bottom edge, and white thread. Pattern like Simplicity 1807 can be super helpful if you’re not confident freehanding it.
For the Apron:
White cotton sateen gives you that nice slight sheen without being too fancy. Another separating zipper, more interfacing, and this is where things get fun with the decorating supplies. Fabric paint, acrylic paint with textile medium, Model Magic clay for sculpting the skull, Mod Podge for sealing, brushes, snaps, and a hot glue gun with plenty of glue sticks.
Basic Tools:
A decent sewing machine (doesn’t need to be fancy), sharp fabric scissors, pins, measuring tape, and a seam ripper because we all make mistakes.

Building Your Petticoat First (Trust Me On This)
Starting with the petticoat might seem boring but it’s actually the smart move. It determines how the dress is gonna sit and you need those measurements before cutting your dress fabric.
Step 1: Cut Your Pieces
Use your pattern or draft a simple rectangle skirt with front and back panels. The length should hit just above your knees when worn at your natural waist.
Step 2: Sew Side Seams
Pin your front and back pieces right sides together and sew up those side seams. Use a straight stitch and remember to backstitch at the beginning and end.
Step 3: Add the Lace Trim
This goes along the bottom hem and adds that extra bit of vintage charm. Pin it carefully so it lays flat and sew it on with a zig-zag stitch or straight stitch depending on your lace type.
Step 4: Create the Waistband
Fold over the top edge to create a casing wide enough for your elastic. Leave a small opening, thread your elastic through, adjust to fit your waist comfortably, and sew the ends together. Close up that opening and you’re done with the petticoat. See? Not so bad.

Tackling the Blue Dress (The Main Event)
Okay deep breath because this is where things get real. The dress is definitely the most time-consuming part but also the most rewarding.
The Bodice Construction:
Start by cutting out your bodice pieces—you’ll have front and back sections. Interface the pieces that need extra structure (usually the front bodice and collar area). Pin and sew the front and back together at the side seams and shoulder seams. Finish those seams with a zig-zag stitch so they don’t fray all over the place.