Flatlay of Hatsune Miku cosplay essentials including a turquoise wig, teal eyeshadow palette, false eyelashes, blue contacts, headphones, arm warmers, and a mini leek on a white textured surface, illuminated by soft natural light.

The Ultimate Hatsune Miku Cosplay: From Beginner to Pro

Hey there, fellow cosplay enthusiasts!

I’ve been creating Miku cosplay content for years, and today I’m gonna share everything I’ve learned about bringing this iconic virtual idol to life.

A bright cosplay makeup studio with floor-to-ceiling windows, featuring a cosplayer at a white vanity applying teal eyeshadow while wearing a turquoise Miku wig. The vanity is organized with false lashes, colored contacts, and makeup brushes, illuminated by soft morning light.

💡 Pro Tip: Create a dedicated Miku cosplay workspace with cool-toned lighting and mirrored surfaces to practice poses, test makeup application, and perfect your wig styling before the event.
🚫 Avoid This: Avoid warm, dim lighting in your cosplay prep area—it won’t accurately represent stage lighting conditions and will make it harder to match your makeup and costume details to how they’ll actually appear at conventions or performances.

Miku’s signature teal and electric blue aesthetic demands a space that honors that vibrant, digital-idol energy. Whether you’re a seasoned cosplayer or just starting your first Miku build, having the right environment transforms costume creation from a chore into an immersive creative experience.

Getting Started: The Essentials

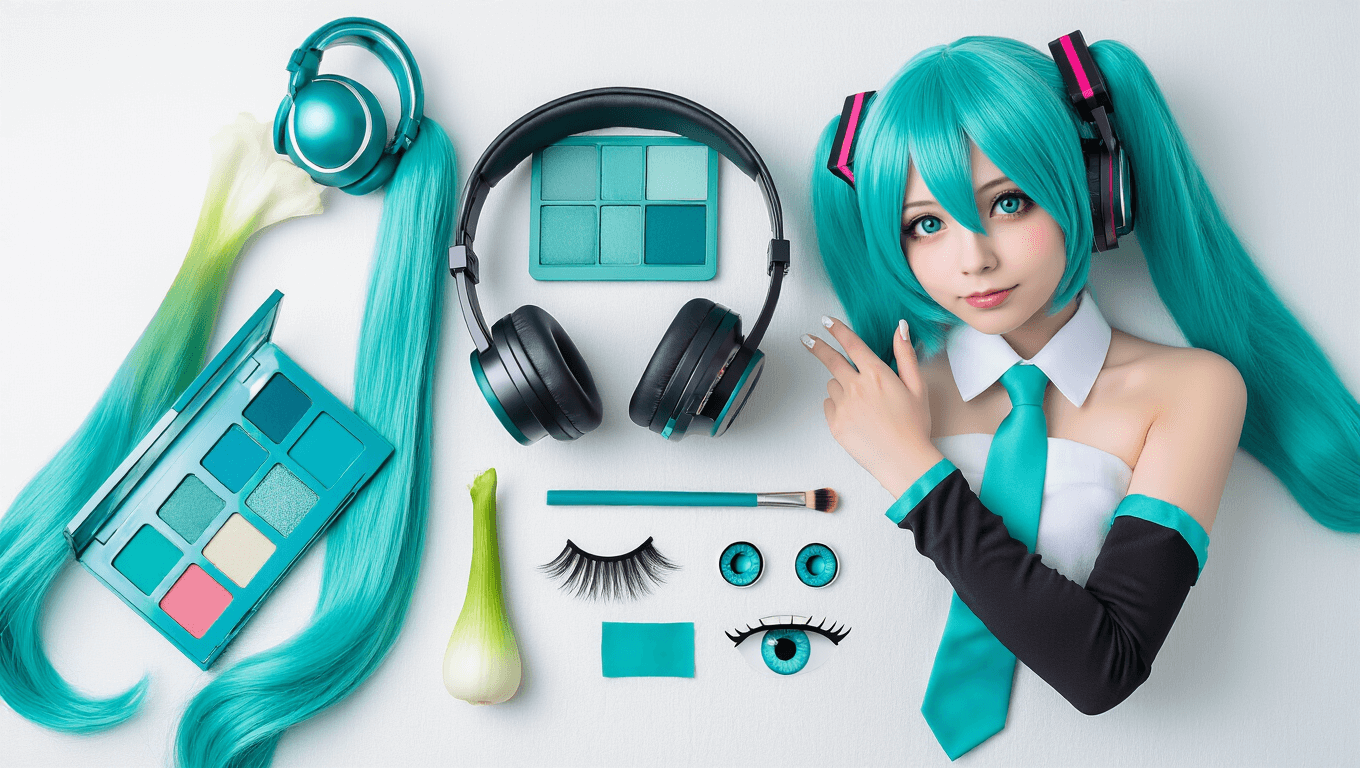
First things first – you’ll need the perfect wig. Trust me, I learned this the hard way! A high-quality turquoise cosplay wig is absolutely worth the investment. Look for one that’s about 100-120cm long for those signature twintails.

For the costume itself, you’ve got options:

  • Beginner: Start with a basic Miku costume set ($50-100)
  • Intermediate: Official licensed costumes ($100-200)
  • Advanced: Custom-made outfits ($200+)

Cosplayer in a premium Hatsune Miku costume posing in an urban Japanese-inspired garden at golden hour, holding a traditional leek prop, with cherry blossoms in the blurred background.

🔎 Pro Tip: Invest in a wig first before any other costume piece – it’s the most recognizable Miku element and sets the tone for your entire build. A 100-120cm turquoise wig with good density will instantly read as Miku and make everything else come together faster.
⚠ Avoid This: Avoid cheap synthetic wigs under $15 – they tangle easily, look plastic-y in photos, and shed fibers all over your workspace and costume pieces. Budget wigs will frustrate you during styling and ruin the final look.

Building a Miku cosplay is an exciting journey, and getting the foundational pieces right from the start makes the whole experience more enjoyable. The wig really is the soul of this costume – when you put it on, you’ll immediately feel like you’re becoming Miku.

The Makeup Magic

Here’s what’s worked best for me:

  • Teal eyeshadow (match it to your wig!)
  • False lashes for that anime look
  • Colored contacts (optional but amazing)

Close-up of hands styling a professional Miku wig on a mannequin, highlighting the process of shaping twintails, with styling tools and reference photos arranged on a clean white workspace under soft, even lighting.

🚀 Pro Tip: Coordinate your eyeshadow teal undertone with your specific wig shade—cool-toned teals work best with silver or platinum wigs, while warmer teals complement blue-green synthetic fibers.
⚠ Avoid This: Avoid matte teal eyeshadows that lack dimension; they’ll look flat on camera and in photos. Choose shimmers or metallics that catch light like anime character eyes.

Miku’s signature teal is iconic, and nailing the eye makeup is what makes the entire cosplay recognizable from across a convention floor. This is where your costume transforms from outfit to character.

Props and Accessories

You can’t forget the iconic pieces:

  • Headphones/headset
  • The famous leek (yes, really!)
  • Arm warmers
  • Black boots

A cosplayer practicing Miku poses in a contemporary dance studio with mirrored walls and wooden floors, illuminated by natural light. The costume captures essential design elements, while professional lighting equipment is reflected in the mirrors.

★ Pro Tip: Miku’s signature accessories are instantly recognizable—prioritize the teal headphones and leek prop as your display centerpiece, as these are the most iconic items that immediately signal the character to any viewer.
❌ Avoid This: Avoid using cheap costume-grade materials for props you’ll display or wear frequently; invest in higher-quality replicas or crafted versions of the headphones and leek that will photograph better and last through multiple conventions or photoshoots.

These aren’t just costume pieces—they’re the visual shorthand that makes Miku unmistakably Miku. Building or sourcing quality versions of these props transforms your cosplay from generic to instantly recognizable, and they become treasured display pieces long after the convention ends.

Photography Tips

Listen, getting those perfect Miku shots isn’t just about throwing on the costume. Here’s what I’ve found works:

  • Natural light is your bestie (early morning or golden hour)
  • Clean backgrounds (less is more!)
  • Mix up your poses (think idol performance!)

A cosplayer in a licensed Miku costume poses in a professional photography studio with a seamless white backdrop, showcasing detailed headphones, arm warmers, and vibrant teal accents, enhanced by clean studio lighting.

✨ Pro Tip: Shoot during golden hour (early morning or late afternoon) to get that signature teal-blue glow that complements Miku’s iconic hair color—the warm light creates dimensional depth in the costume details without harsh shadows.
⚠ Avoid This: Avoid shooting indoors under fluorescent or cool-toned LED lighting, which will drain the vibrant turquoise pigments from the costume and make the wig look flat and lifeless instead of luminous.

Miku cosplay photography is all about capturing movement and energy—her character thrives in dynamic, performance-focused poses, so you’ll want lighting and equipment that lets you freeze those idol-stage moments with clarity and color accuracy.

Common Mistakes to Avoid

Y’all, I’ve made every mistake in the book, so learn from me:

  • Don’t skimp on the wig styling
  • Watch out for overexposed photos (teal hair can look washed out)
  • Keep accessories canon – less is more!

A flatlay of Miku cosplay essentials includes a high-quality teal wig, a makeup palette with teal shades, false lashes, colored contacts in their case, and various costume accessories, all arranged on a white textured surface, illuminated by soft afternoon light from a window.

✨ Pro Tip: Invest in a quality wig styling kit with heat-resistant tools and specialized shampoo—poorly styled wigs read as costume rather than character, and teal synthetic fibers are particularly prone to frizz and color distortion under photography lighting.
⛔ Avoid This: Avoid using harsh direct flash or bright overhead lighting when photographing teal-colored wigs, as these create overexposure and wash out the vibrant cyan tones that define Miku’s iconic look. Don’t over-accessorize with non-canon items; Miku’s minimalist design relies on specific signature pieces (twin-tail clips, specific collar style) rather than layered accessories.

Miku cosplay is instantly recognizable because of precise details—your wig and lighting choices make or break whether people recognize you as the character. Respecting the canon design actually makes you stand out more than adding extras.

Final Thoughts

Remember, cosplay is about having fun! Whether you’re rocking a basic costume or going all-out with a professional setup, what matters most is enjoying yourself and connecting with other fans.

Got questions? Drop ’em below! I love helping fellow Miku cosplayers level up their game.

Remember to tag your photos with #MikuCosplay – maybe I’ll see you at the next con!

A dynamic Miku cosplayer mid-performance in a modern convention center hallway, showcasing her flowing costume and twintails, with dramatic shadows and highlights from professional lighting, captured in a wide-angle perspective that emphasizes the grandeur of the space.

Leave a Reply

Your email address will not be published. Required fields are marked *