Transform Your Space Into a Magical Sanctuary: My Complete Room Makeover Guide
Contents
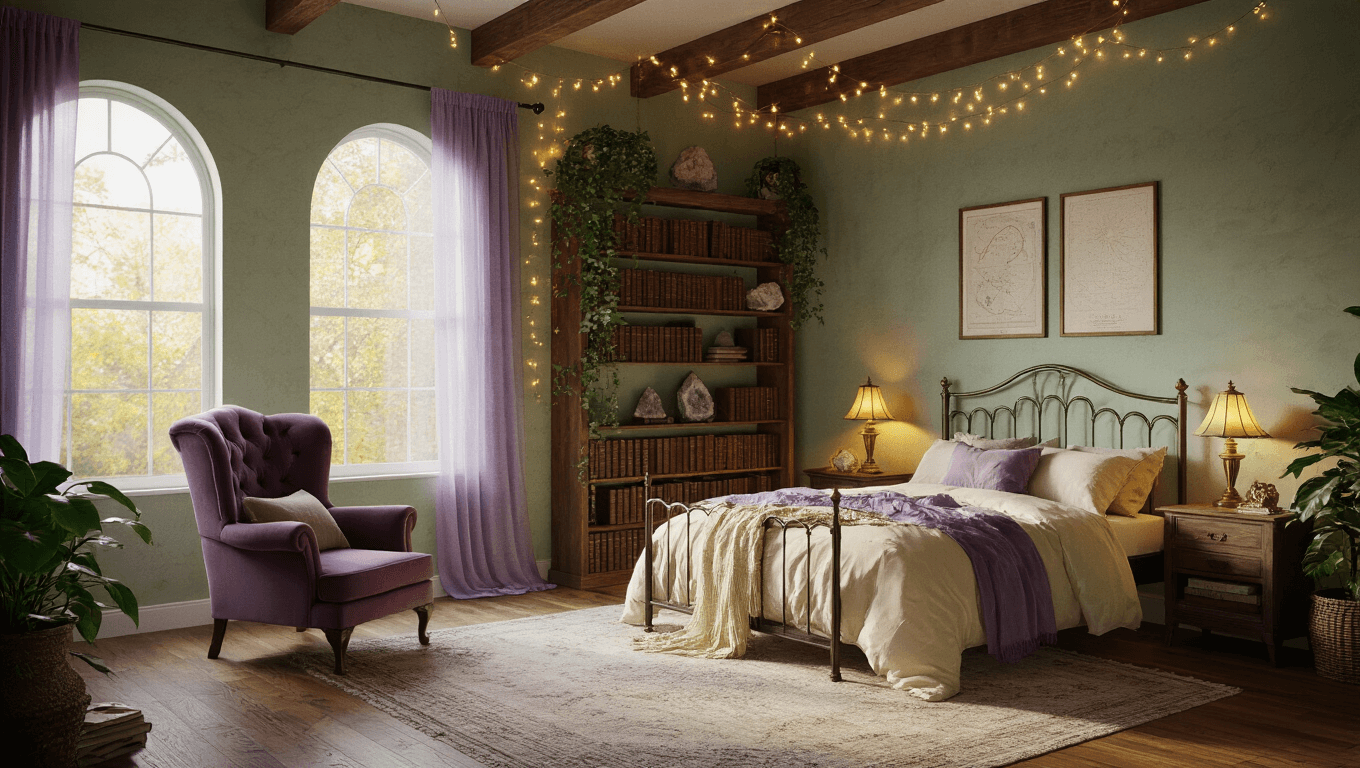
Magical themed room makeover isn’t just about slapping some fairy lights on the wall and calling it a day.
I learned this the hard way when I first attempted to recreate that enchanted atmosphere I’d been pinning obsessively on Pinterest for months.
My first attempt looked like a teenager’s dorm room collided with a craft store clearance bin.
The thing is, your bedroom should feel like stepping through a wardrobe into another world—not like you bought out the entire Halloween section at Target.
You’re probably wondering if you can actually pull this off without spending your entire paycheck or needing an interior design degree.
I’m here to tell you that yes, you absolutely can create that dreamy, magical sanctuary you’ve been craving.

Why Your Current Space Isn’t Working
Let me guess what’s happening right now.
You’ve got some random decorative items scattered around, maybe a few candles, possibly some string lights tangled in a corner.
Nothing feels cohesive.
Everything feels random.
The magic just isn’t there.
Here’s what’s actually going wrong:
- You’re buying individual pieces you like without an overall vision
- Your lighting is doing nothing for the atmosphere
- You haven’t committed to a proper color story
- Your shelves look cluttered instead of curated
- There’s no focal point pulling everything together
I spent nearly $400 on decor before I realized I was doing it all backwards.
The Game-Changing Approach That Actually Works
Start with your anchor piece and build everything around it.
This changed everything for me.
Here’s your actual starting point:
Pick ONE statement element that screams “magical” to you—whether that’s a canopy bed frame, a stunning vintage bookcase, or a cozy reading nook with a comfortable reading chair.
Everything else supports this hero piece.
Not the other way around.
When I finally committed to making my bookcase the star of the show, suddenly all those random trinkets I’d collected had a purpose and a home.

Getting Your Foundation Right
Paint matters more than you think.
I know, I know—painting sounds like a massive undertaking.
But honestly, keeping your existing beige walls while trying to create an enchanted forest vibe is like trying to make a gourmet meal in a dirty kitchen.
Best wall colors for magical vibes:
- Soft sage green (my personal favorite—it makes everything look like it belongs in a secret garden)
- Warm gray with purple undertones
- Dusty lavender for full fairy tale energy
- Deep charcoal if you’re going dark academia
I went with a soft gray-green that I mixed myself by adding a bit of green tint to a pale gray base.
Cost me about $45 for enough paint to do my entire bedroom.
Before you put anything on the walls:
- Clear out EVERYTHING from the room
- Clean thoroughly—dust shows up embarrassingly fast on mystical decor
- Repair any wall damage
- Plan your furniture layout on paper first
- Mark where lighting fixtures will go
That last point saved me from having to rearrange fairy string lights three different times.
The Lighting That Creates Actual Magic
Overhead fluorescent lighting is the enemy of enchantment.
I cannot stress this enough.
Layer your lighting like this:
Ambient layer (the overall glow):
- Warm-toned LED fairy lights draped across the ceiling or around your bed frame
- A dimmer switch on your main light (this $15 investment changed my entire room)
- Sheer curtains that filter natural light during the day
Task layer (for actual functionality):
- A good reading lamp with warm bulbs
- Clip-on book lights if you’re creating a reading nook
- Under-shelf lighting on your bookcase
Accent layer (the drama):
- Clusters of pillar candles at varying heights
- A vintage-style table lamp with a fabric shade
- LED candles in lanterns for that witchy cottage feel
I spent about $120 total on all my lighting, but I bought most of it over two months when I found good deals.
The fairy lights alone dropped the price by half when I waited for a sale.

Building Your Gallery Wall Without Losing Your Mind
This is where most people give up.
They buy frames, lean them against the wall for six months, then eventually hang two pictures awkwardly spaced and call it done.
My method that actually works:
Step one: Collect your art FIRST
- Print magical landscape paintings from art databases (completely legal and free)
- Thrift vintage frames in various sizes
- Look for old maps, botanical prints, and mysterious portraits
- Mix in a few meaningful pieces—maybe tarot card prints or constellation maps
I found a collection of vintage frames at an estate sale for $30 total.
Cleaned them up, spray painted some of them matte black, left others with their original gold finish.
Step two: The layout trick that changed everything
Cut out paper templates the exact size of each frame.
Tape them to the wall in different arrangements until something feels right.
This took me maybe 20 minutes and saved me from putting 15 nail holes in my wall.
Step three: Create visual balance
- Put your largest piece slightly off-center (not dead center—that’s boring)
- Cluster smaller frames around it
- Keep consistent spacing between frames (I used 2-3 inches everywhere