How a Pegboard Saved My Sanity (and My Cosplay Tools)
Contents
Pegboards are an excellent solution for organizing cosplay tools and materials, transforming a cluttered workspace into an efficient, visually accessible creative hub. Whether you’re crafting armor, sewing costumes, or assembling props, a well-organized pegboard system keeps your most-used tools within arm’s reach while maintaining visual inspiration.
Look, I’ll be honest with you. Six months ago, I was digging through three different drawers just to find my fabric scissors. My rotary cutter had vanished into what I call “the craft room black hole.” And don’t even get me started on the twenty minutes I spent hunting for my heat gun right before a convention deadline.
Sound familiar?
Here’s what changed everything: I finally stopped ignoring the mess and installed a pegboard. Not just any pegboard—a properly organized cosplay command center that actually works.
")
Why Your Current Storage System Is Failing You
You’ve probably got tools shoved in drawers. Maybe some plastic bins under your worktable. Perhaps a sad little cup holding scissors and craft knives.
The problem? You can’t see what you own. You waste time searching instead of creating. And when you’re racing against a con deadline, every minute matters.
A pegboard solves this by putting everything in plain sight. No more excavating through drawers like an archaeological dig. No more buying duplicate tools because you forgot you already owned them.
Project Overview
Quick Style Snapshot
- Time needed for setup and styling: 2-4 hours for initial installation (trust me, it’s worth every minute)
- Estimated cost range: $50-$300+ depending on your wall size and how fancy you want to get
- Ideal space size: Works for walls 24″ to 48″ wide; go bigger if you’ve got the space
- DIY skill level: Beginner-friendly—if you can use a drill, you’re golden
- Seasonal or year-round appeal: Year-round organization that adapts to whatever costume you’re building
Design Identity
- Core design style: Functional maker aesthetic with that satisfying industrial vibe
- Key materials: Metal or wooden pegboard, pegboard hooks and accessories, magnetic tool strips, clear storage containers
- Perfect for: Anyone who’s ever lost a tool mid-project and contemplated giving up cosplay forever
- Works best in: Craft rooms, garage workshops, sewing spaces, or that spare bedroom you’ve claimed as your creative domain
")
The Foundation: What You Actually Need
The Pegboard Itself
Here’s where people get overwhelmed. Don’t.
You’ve got two main choices: metal or wood.
Metal pegboards are my personal favorite. They’re durable, they work with magnetic accessories, and they look professional. Plus, they won’t warp if your craft room gets humid.
Wooden pegboards are cheaper and easier to customize with paint. They’re perfectly fine, especially if you’re on a budget.
Start with whatever fits your wall space. A standard 24″ x 48″ board handles most cosplayers’ needs. If you’re drowning in supplies like I was, go bigger—48″ x 48″ or multiple boards.
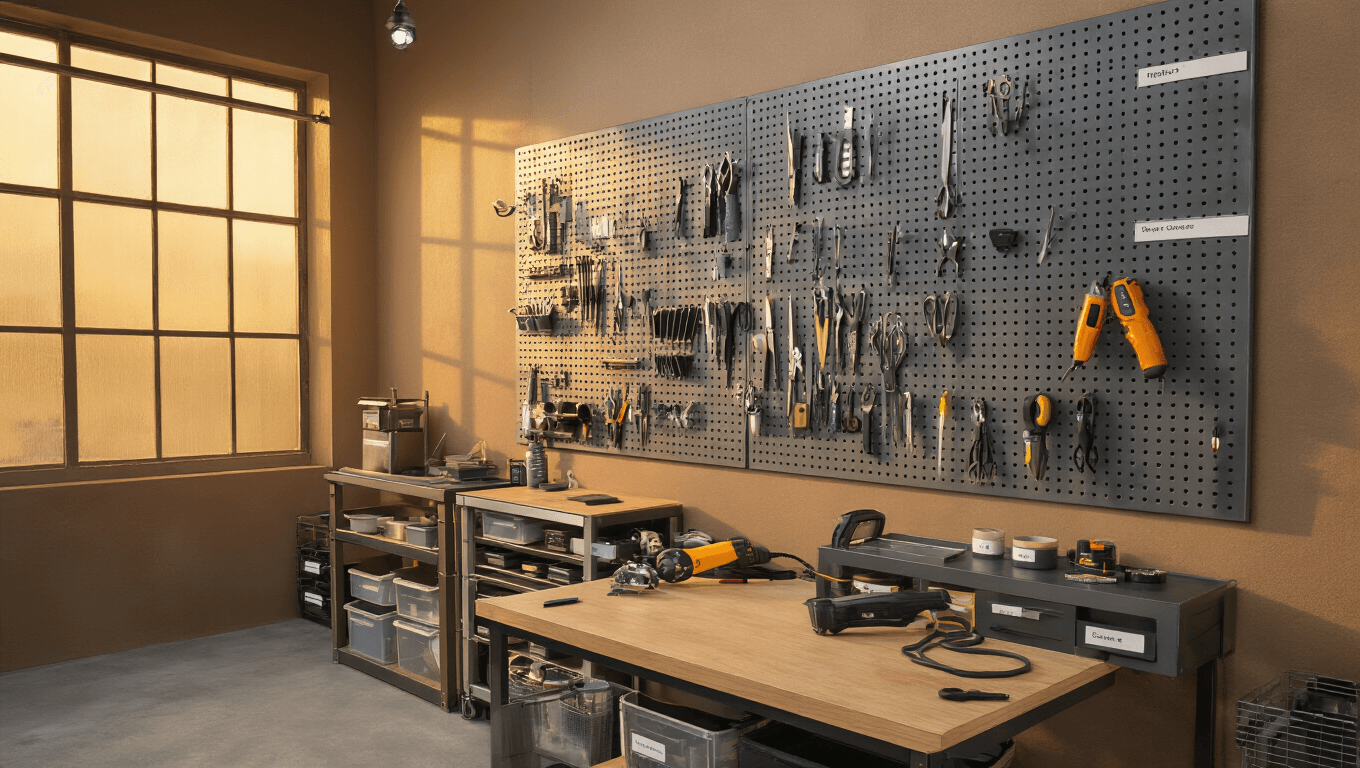
The Hooks and Holders That Actually Work
This is where the magic happens. Forget those tiny matching hook sets that come in blister packs. You need variety.
Get yourself a comprehensive pegboard hook assortment with:
- J-hooks in multiple sizes for hanging tools
- Bin holders for containers of small parts
- Tool holders designed for specific items like screwdrivers or pliers
- Shelf brackets if you want to add horizontal surfaces
I learned this the hard way after buying three identical hook sets and discovering none of them worked for my heat gun.
")
Styling & Decor Essentials
Must-Have Items
Let me walk you through what transformed my chaotic workspace into something that actually sparked joy (and productivity).
Magnetic strips are game-changers. Seriously. Mount a magnetic tool holder across the top of your pegboard. Every metal tool you own—scissors, snips, needle-nose pliers, tweezers—just sticks there. No hooks required. No fumbling. Just grab and go.
Your hero tools deserve the spotlight. I’m talking about those specialty items you reach for constantly:
- Rotary cutters
- Heat guns
- Precision craft knives
- Specialized fabric shears
- Dremel tools
Give each one its own dedicated spot on individual pegs. Not crowded together. Not fighting for space. Each tool gets its moment.
Small parts need containment. This was my biggest revelation. All those tiny components—snaps, rivets, LEDs, jump rings, tiny screws—they need clear pegboard storage containers.
Why clear? Because you need to see what’s inside without taking them down. Label them if you’re feeling organized (I did, and it changed my life).
Complementary Decor
Here’s where you stop being purely functional and start having some fun.
Create visual zones. I divided my pegboard into neighborhoods:
- Cutting territory (rotary cutters, scissors, fabric shears, rulers)
- Assembly district (glue guns, fasteners, hardware, clips)
- Detail neighborhood (paint brushes, fine tools, precision instruments)
- Inspiration corner (reference photos, color swatches, artwork)
This sounds formal, but it’s not. It just means similar stuff